INSTRUMENTS / GENERATORS
Morphine Generator Panel

An Overview of Synthesis in Morphine
The Generator Page contains the Additive Synthesis controls for Morphine. As has been discussed in the introduction, Additive synthesis builds more complex waveforms from a harmonic sequence of sine-waves. Better yet, Morphine can interpolate a series of these harmonic 'snapshots', that may be manually programmed or derived from samples, to re/create infinitely complex sounds. In other words, Morphine can generate synthetic 'samples'. There are four main features of the Morphine architecture -
- Harmonics: Each note consist of a fundamental (or root) sine wave and, optionally, a series of harmonics (higher frequency sine waves linked to the root) to create almost any waveform. The architecture allows harmonic amplitude, tuning and panning to be modulated creating infinitely complex and rich tones. Each set of 128 harmonic properties and associated modifiers is termed a 'Breakpoint'.
- Harmonic Morphing & Modulation: Breakpoint properties such as harmonic amplitude, tuning and panning can be interpolated to produce a continuous evolving sound, known as a 'Spectrum'.
- Keyboard Zones: Zones add the ability to spread unique Spectra across the keyboard. If desired each note from C0 to C11 can play a unique Spectrum!
- Generator Mixing: The 4 Generators can be dynamically cross-faded using the Morph/Mix control panel. Given that each Generator can contain a set of morphing Breakpoints, the possibilities are limitless.
The aim was to provide the sound designer with a rich palette of evolving sounds that can be mixed, real-time, in response to modulation parameters time or tempo. By now the Morph in Morphine should be clear.
Controls
This section describes the synthesis controls and their operation.
GENERATOR A, B C & D
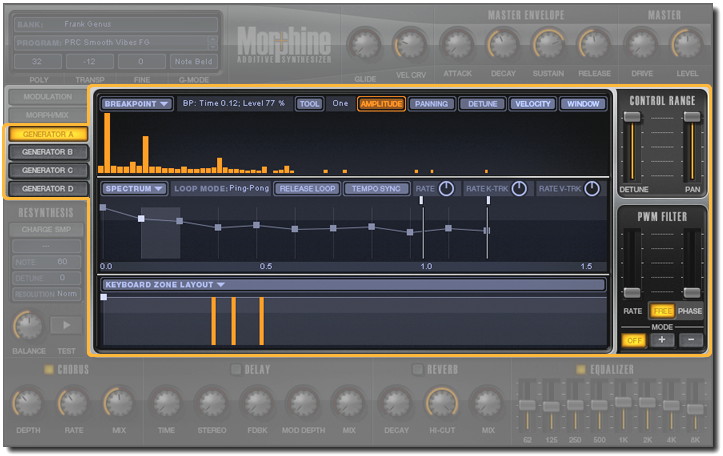
The 4 GENERATORS in Morphine have the same set of properties that modify the response of 128 harmonics per voice. Further, in combination with Keyboard Zones, Generators can contain multiple, independent, 'sub-voices' assigned to play over unique keyboard ranges. The components of the Generators are described, starting from the bottom of the Generator Page (as shown above) working upwards:
- KEYBOARD ZONE LAYOUT - Each Generator can include multiple Keyboard Zones controlled by the KEYBOARD ZONE LAYOUT control. The control defines both the keyboard range (as shown by the
horizontal line), for each voice, and the playback level (height). At least one Keyboard Zone must exist for each GENERATOR, the default covers notes C0 to C11. NOTE: Each zone represents a completely
independent SPECTRUM (a set of interpolated BREAKPOINTS). This allows different sounds to be spread across the keyboard for each Generator. The most common use of
Keyboard Zones is to balance the tonal properties of imported Spectra (see the Resynthesis section) across the keyboard, similar to a multi-sampled sound in a sampler. However, you can also use Zones to make
a set of completely unrelated sounds on every key if desired.

- Select Zone - Left-click between Zone Markers (small squares). This will change the harmonic partial editor and spectrum editor to show the values of the currently selected zone.
- Create Zone - Right-click (or Alt + Left-click) at the point where the zone should start. NOTE: New Zones open with a default Spectrum (i.e. silent).
- Delete Zone - Right-click (or Alt + Left-click) the zone Marker (square) at start of the zone.
- Change Zone Range - Left-click the Marker at the start of the zone and drag horizontally.
- Change Zone Volume - Left-click the Marker at the start of the zone and drag vertically.
- Select Zone - Click anywhere inside the zone range. This will change the harmonic editor to show Spectrum Breakpoint & Spectrum values.
- KEYBOARD ZONE LAYOUT (Drop-down menu) :
- Import Kbd Zone Layout - Loads a zone layout from disk. Please note, this loads a set of zones saved for the current GENERATOR. Drag-n-drop is supported.
- Export Kbd Zone Layout - Saves zone layout to the disk.
- Copy - Copies all zones for the current Generator so that they can be pasted into another Generator.
- Paste - Pastes zone layout.
- Reset - Initializes the layout, setting it to the default state. NOTE: this will reset all zones for the current GENERATOR. The initial zone will have no harmonics set so won't produce sound (tabula raza!).
- SPECTRUM EDITOR - The Spectrum Envelope holds a series of harmonic snapshots (BREAKPOINTS), represented by the points along the envelope (height is level, horizontal distance is
time). The harmonic properties of each Breakpoint are set using the BREAKPOINT EDITOR described in the next section. The envelope 'plays' the sequence of Breakpoints morphing from one to the next creating
what is termed the SPECTRUM for the KEYBOARD ZONE. The SPECTRUM can include an unlimited number of BREAKPOINTS including LEVEL, PAN and DETUNE for the 128 harmonics. The two additional
harmonic properties, WINDOW (a filter curve) and VELOCITY (velocity responsiveness) apply to all Breakpoints in the Spectrum and so remain constant.

Each Keyboard Zone contains one Spectrum. The Spectrum Editor allows you to edit the Spectrum of the currently selected (highlighted) Keyboard Zone, as follows:
- Select Breakpoint - Left-click in the space between Breakpoint Markers and the Breakpoint to the left will be selected (You can click directly on the Breakpoint Markers however it is easy to accidentally move them using this technique).
- Add Breakpoint - Right-click (or Alt + Left-click) at the place where the Breakpoint should appear. Both the level and time are selected on the basis of the cursor position.
- Delete Breakpoint - Right-click (or Alt + Left-click) the Breakpoint Marker.
- Breakpoint Level (Volume) - Left-click and drag the Breakpoint Marker up or down.
- Temporal position (timing) - Left-click and drag the Breakpoint Marker horizontally. The time-line below shows the time in seconds. The level (%) and time is also displayed in the info-bar above partial editor (near Partials label). Timing is in seconds unless the TEMPO SYNC button is enabled, then timing is in beats (related to the host sequencer tempo).
- SPECTRUM (Drop-down menu):
- Import/Export spectrum - Opens a dialog to load/save a Spectrum to/from disk. Drag-n-drop is supported.
- Copy Spectrum - Copies the current spectrum. This can be pasted in another spectrum at another keyboard zone, generator or even another Morphine instance.
- Paste spectrum - Paste the spectrum copied above.
- Paste Velocity - Paste only Velocity response coefficients (see in Breakpoint Editor section).
- Paste Window - Paste only Window data (see in Breakpoint Editor section).
- Reset Spectrum/Velocity/Window - Resets the spectrum, or portion of it, to default (empty) state.
- Normalize Level - Will normalize the general level of Breakpoints, so the level of spectrum sounding will be maximized.
- Delete Breakpoints Before/Within/After loop - Deletes the Breakpoints in the region specified. Before the loop refers to the loop start Marker, Within the loop refers to the points bounded by the loop Markers and After the loop refers to points after the loop end Marker.
- Import Charged Sample - See the Resynthesis section.
- LOOP MODE - The spectrum envelope can be looped by dragging the loop start and end Markers (shown set to the last two points in the envelope above) to the desired points in the envelope. When the
loop start is reached the Spectrum timer loops the region bounded by the start and end points according to the LOOP MODE setting. Left-click on the LOOP MODE menu, text after the label, to set the loop
type. NOTE: Loop start/end markers can be placed anywhere and don't need to fall on Breakpoint Markers. 4 loop modes are possible:
- Ping-Pong - The loop will bounce back and forth between the start and end positions.
- Forward - The loop will jump back to the loop start each time it reaches the loop end.
- Backward - The envelope will play to the loop end then play backward to the loop start, jump to the loop end again and repeat this process.
- Off - No looping. The envelope plays through to the last point and holds that value.
Pausing a Breakpoint - To stop at a given place in the envelope, make the loop start and end positions the same. If RELEASE LOOP mode is on, the envelope will continue past this point when you release the note.
- RELEASE LOOP - This button controls timer behavior when a note is released. When release loop button is enabled, after you release the note the loop will jump out of loop-mode and jump to the next Breakpoint after the loop end point.
- TEMPO SYNC - Changes the envelope to play back in sync with the host tempo. The time display will change to beats.
- RATE - Changes the envelope playback speed, right = faster, left = slower. The default value = 0.0, no change. NOTE: The time-base changes so the breakpoints are displayed against their correct time values in ruler below.
- K-TRK (Keyboard Tracking) - Acts as an envelope playback speed modifier in response to keyboard/note position. When positive values are set the higher keys will progress through the spectrum envelope faster. Negative values will cause lower notes to progress through the spectrum envelope slower.
- V-TRK (Velocity Tracking) - Acts as an envelope playback speed modifier in response to note velocity. Positive values will speed the envelope with higher velocities, negative values will slow the envelope with increasing velocity.
Spectrum Editor Tips and Tricks
- Selecting Breakpoints - To select a Breakpoint Marker to edit its values, it's not necessary to click on the point on the envelope, click somewhere between the desired Breakpoint and next one.
- Scroll the envelope window - Click and hold the time/beat display ruler below the envelope and drag left/right to access time beyond those displayed in the window.
- Zoom - To Zoom the spectrum envelope roll the mouse-wheel. Alternatively Click + Shift on the ruler below the envelope and drag the mouse up and down.
- Reposition a Breakpoint - To shift the relative position of a Breakpoint without disturbing others hold Shift and move the Breakpoint Marker.
- BREAKPOINT EDITOR - Each BREAKPOINT has level, panning and detune properties for each of 128 harmonics that creates the waveform for that Breakpoint.
The Breakpoint is just one moment in time as defined by the SPECTRUM ENVELOPE, as described in the preceding section. There are two additional harmonic properties, Velocity and
Window, these are global settings that apply to all Breakpoints on the Spectrum and so do not change with time.

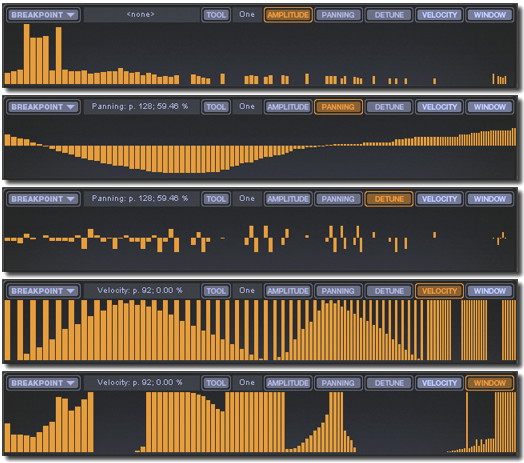
As shown above there are 5 properties that can be accessed by selecting the switch along the top of the Breakpoint Editor window. To change the values Left-click at the partial to be edited and move your mouse up/down. To reset/delete values Right-click (or Alt + Left-click) at the partial to be edited. The functions of the various properties are described below:
- BREAKPOINT (Drop-down menu):
- Import Breakpoint/Waveshape - Load previously saved breakpoints or import wave shapes from an audio file (.wav, .aiff). Drag-n-drop is supported.
- Export Breakpoint - Save a breakpoint to file.
- Copy Breakpoint - Copy the currently selected Breakpoint (remember a Breakpoint includes all 'views' - Amplitude, Detune, and Panning).
- Paste Breakpoint - Paste the contents of the Breakpoint buffer to the currently selected breakpoint (Amplitude, Detune, and Panning).
- Paste Current View - Pastes only the currently selected Breakpoint view (Amplitude, Detune, OR Panning).
- Paste Current View to all Breakpoints - Applies the current Breakpoint view (Amplitude, Detune OR Panning) to all Breakpoints in the Spectrum.
- Reset Breakpoint - Clears the breakpoint (blank).
- Reset current view - Resets the current view only (Amplitude, Detune OR Panning).
- AMPLITUDE - Displays volume level for each of the 128 harmonics. Values can range from 0% (no bar showing) to 100% (maximum height). NOTE: The overall level of the harmonics also depends on the Breakpoint level set in the SPECTRUM Editor as described in the Spectrum Editor section.
- DETUNE - Applies a frequency offset to the selected harmonic. As the frequency of each harmonic is equal to the root-note frequency multiplied to the harmonic number (1 to 128), detune allows you to change set sub-integer (decimal) tuning values to the harmonics. Setting detune values to MAX/MIN values will make them equal to the neighbouring harmonic. Detuning harmonics causes the sound to take on the character of acoustic instruments and sounds, including some 'unison' effects.
- PANNING - Places the harmonic in the stereo field. Move bars up to right, down to pan Left.
- VELOCITY - This is a global modifier and sets the harmonic partial velocity sensitivity for all Breakpoints of the currently selected Spectrum. The higher the bar, the greater the velocity modulation of the harmonics/partials volume. No bar means velocity will have no effect.
- WINDOW (Frequency Domain Window) - This is a global harmonic volume modifier for all Breakpoints of the currently selected Spectrum (it functions as a harmonic filter). The smaller the bar the quieter all harmonics in the Spectrum will be. By default, all Window columns are set to maximum (no
change).
NOTE: When the Breakpoint Menu is in Window and Velocity edit modes, has no copy/paste values as these are already global functions for the Spectrum. To reset, copy or paste go to the spectrum menu and click the desired Spectrum menu option.
- TOOL (Drop-down menu) - Changes the edit behavior of the values. There are two edit modes for this tool setting, Normal (Left-click & Drag): The value will jump to the mouse position
and then move with the mouse. Relative (SHIFT + Drag): Edits are 'relative' for the affected value/s.
- One - Edit single harmonics (default mode).
- Odd - Raise/lower all odd numbered harmonics (1,3,5...127).
- Even - Raise/lower all even numbered harmonics (2,4,6...128).
- 3rds - Raise/lower every 3rd harmonic (3,6,9...126).
- 4ths - Raise/lower every 4th harmonic (4,8,12...128).
- 5ths - Raise/lower every 5th harmonic (5,10,15...125).
- FLT 1 - Filter Narrow, raise/lower a narrow bandwidth around the target harmonic.
- FLT 2 - Filter Medium, raise/lower a medium bandwidth around the target harmonic.
- FLT 3 - Filter Wide, raise/lower a wide bandwidth around the target harmonic.
- FLT 4 - Filter Extra Wide, raise/lower an extra wide bandwidth around the target harmonic.
Breakpoint Editor Tips and Tricks
- Zero a harmonic - To reset a harmonic value to zero, Right-click (or Alt + Left-click). To reset a range Right-click (or Alt + Left-click) and drag the mouse across the harmonics to be reset.
- The important harmonics - The first 16 harmonics are most audible and so important to the final sound. Often the highest harmonics are set to low levels in order to subtly affect a sound. These are also more audible when low notes are played. The same principle applies to DETUNE with the lower harmonics having the greatest impact on the sound.
- Values and Labels - When you edit a harmonic its values and number appear in the info bar near the 'PARTIAL' label.
- BREAKPOINT (Drop-down menu):
CONTROL RANGE
Limits the Detune and Pan range of the 128 harmonics for all Breakpoints. NOTE: If these are set to zero then the Detune and Pan values set in the Breakpoints won't have any effect, conversely, if the Breakpoints don't have Detune and Pan values set, then these sliders will have no effect on the sound.
PWM FILTER
PWM FILTER - Each generator has a unique PWM Filter (Pulse Width Modulation). PWM Filters are usually created by adding or subtracting a second (detuned or phase shifted) voice with an original to create unison, phasing or chorus-like effects. As the Morphine architecture provides control over the harmonic spectra it is possible to modulate the 128 harmonic amplitudes of each Breakpoint to simulate voice mixing without the need to double voices. The options include detune, phase, and mix coefficient (positive or negative).- RATE - Modulation speed. Up is faster.
- FREE - OFF: the modulation cycle starts with each note. ON: the modulation cycle is free-running.
- PHASE - Change the phase of the modulation cycle.
- MODE (OFF / + / -) - OFF: No detune simulation. +: Simulates additive voice mixing. -: Simulates subtractive voice mixing.
Breakpoint Editor Tutorial
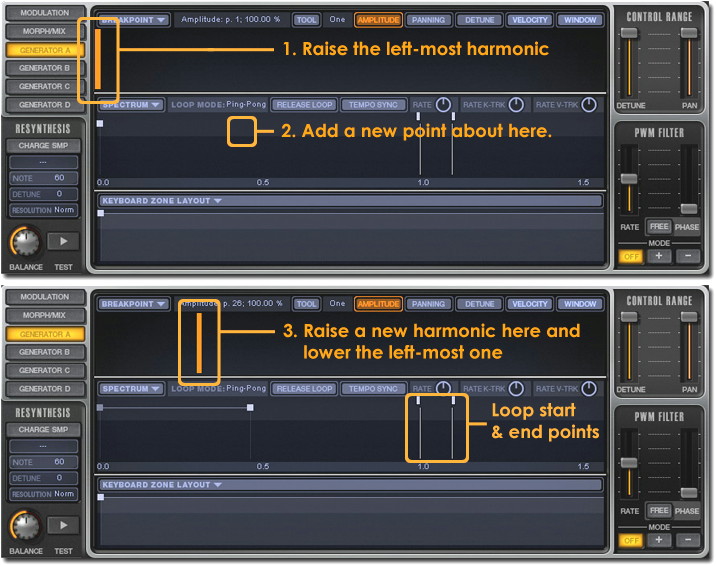
This quick tutorial will show you how to morph between two simple harmonic spectra and give you a feel for working the controls of the Breakpoint Editor window, see the instructions below the image.

Harmonic Morphing
- Reset the patch: Left-click in the Program Name field (top-left window in Morphine) and select 'Reset Program' to call a blank patch.
- Add a harmonic Breakpoint: Click on the AMPLITUDE Breakpoint control and raise the left-most harmonic bar to maximum and play on your keyboard/sequencer. You should hear a single sine wave sound, the fundamental harmonic.
- Add a new morphing envelope point: Right-click (or Alt + Left-click) in the area shown above at (2.) to add a new morphing envelope point. Make sure the point is at the top of the window as the height will affect the volume of the spectra at that point. Adding a point in this way will replicate the spectrum of the point immediately to the left of the new point.
- Customise the new Breakpoint sequence: Lower the original, left-most harmonic and add a new one further to the right. When this patch is played you will hear the low sine morph into a higher one as the harmonics are morphed from the first to second Breakpoint.
- Change the morph speed: Adjust the RATE knob above the envelope window and hear how it affects the speed the envelope is played. You can also modulate the playback speed by changing the RATE K-TRK (keyboard tracking), the RATE V-TRK control or simply moving the Breakpoint left/right. These will change the speed in response to note position and velocity respectively. An alternative envelope mode is the TEMPO SYNC mode where the envelope will play back in beat-time, this is useful for tempo-synced sounds.
- LOOPING: Left-clicking to the right of the LOOP MODE label will open an menu to change the envelope loop type (Off, forward, backward or ping-pong as shown above). The start/end points may be Left-clicked and dragged to the appropriate position on the envelope.
- KEYBOARD ZONES - Keyboard Zones allow you to either program new sounds on any or all keys or to tonally balance a sound across the keyboard (similar to multisamples on a Sampler). When you add a new Keyboard Zone (Right-click or Alt + Left-click in the Keyboard Zone window) it may seem that Morphine has lost your hard work on the current Zone. Fear not! New zones are blank, if you click on the first Keyboard Zone in the lower panel, your first Keyboard Zone will re-appear. Use this method to swap between Zones and Breakpoint Sequences.
ADSR (Attack, Decay, Sustain and Release) Envelopes
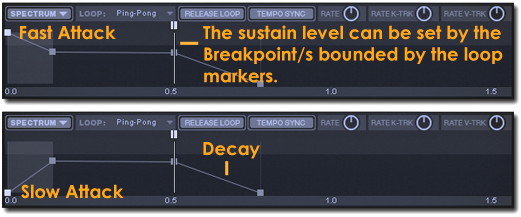
You may be wondering where the ADSR envelopes are for the Generators (A to D). Since the volume envelope of a Spectrum is defined by the height of the Breakpoint Markers a separate ADSR envelope is unnecessary. To set the ADSR of a Spectrum simply draw the desired volume curve. To set a Sustain Level (a constant volume while a key is held) you can either use the last Breakpoint or, if you also need to have a release envelope, then use the Loop Markers to trap the Spectrum at the desired Breakpoint (or set of Breakpoints) and so define the Sustain level. In the example below, the Loop Start and End Markers are placed on the third Breakpoint in the sequence, trapping the Spectrum at that Breakpoint. On release the Spectrum will continue to the last Breakpoint and so the portion after the loop end will define the Release envelope. Don't forget, there is also a Master Envelope, that applies to all Spectra, however bear in mind that this is imposed over the sound of the Generators so it won't add a fast attack to a Generator with an inherently slow attack.
