INSTRUMENTS / GENERATORS
Slicex - Articulation Panel 
Slicex uses advanced beat detection algorithms to slice song/percussion samples into pieces and make them independently playable from the Piano roll or controller. If the wave file contains slice/Region
data this will be automatically used instead of the beat-detection algorithm. Slicex offers playback, reordering of slices and time-stretching capabilities optimized for drum loops. Related plugins are the Fruity Slicer and
Edison.

Master Panel
Articulation Panel
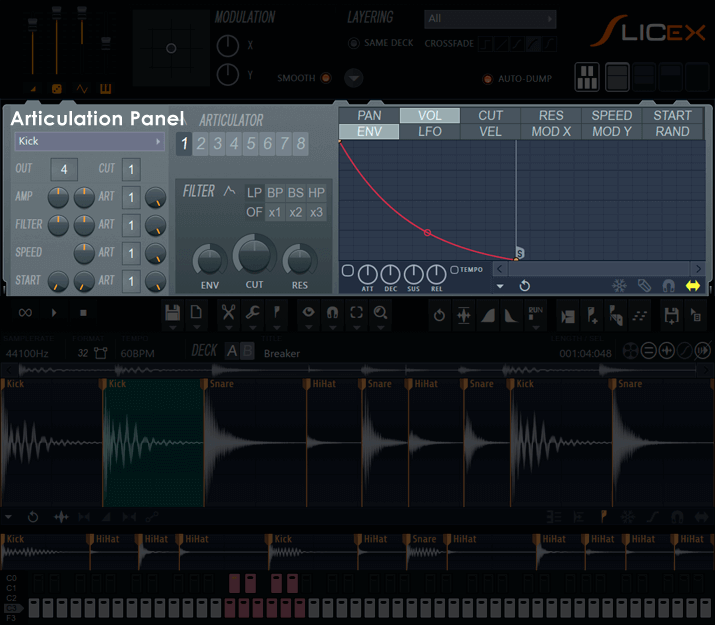
This panel controls envelopes, filtering, Mixer track output routing and other modulation effects applied to the Regions (slices).
Region settings
Each Region has a number of parameters that can be modulated by one of 8 sets of envelopes (Articulators).
- Region selector (Marker #1 to #n) - Each Marker defines the start of an independent Region. Each Region contains the following settings:
- OUT - Output mixer channel offset. '---' = none. Causes Slices to output Regions to indpendent Mixer tracks. Any number set here will be added to Slicex's Mixer Channel mixer track selection. Right-click to see Mixer tracks listed by name.
- CUT - Cut Group controls how one Slice will play in the presence of another. Any Region(Slice) that is playing will be silenced (cut off) by any subsequent Region triggered in the same 'Cut Group'. The sounds must overlap for the Cut Group to have any effect. NOTE: You can assign all Slices to the same cut group with the menu option 'Editor > Regions > Set all cut groups to'.
- AMP (Pan & Level) - Amplitude. ART - Linked articulator, "--" = none.
- FILTER (Cutoff frequency & Resonance) - Filter. ART - Linked articulator.
- SPEED - Playback speed. ART - Linked articulator.
- START (Delay & Start position) - Sample start. There are Options > Settings to limit the variability to the first 100 ms or allow this to vary over the entire sample duration. ART - Linked articulator.
- Articulator 1 to 8 - Each articulator can be used to control the behavior of a linked Region according to the following parameters:
- FILTER - Choose between LP (low pass), BP (band pass), BS (band stop - notch), HP (high pass) at one of three filter cutoff slopes 1x (shallow), 2x (medium) & 3x (steep).
- ENV - Filter cutoff envelope / LFO amount.
- CUT - Filter cutoff frequency. Remember to select a Filter type to activate this control.
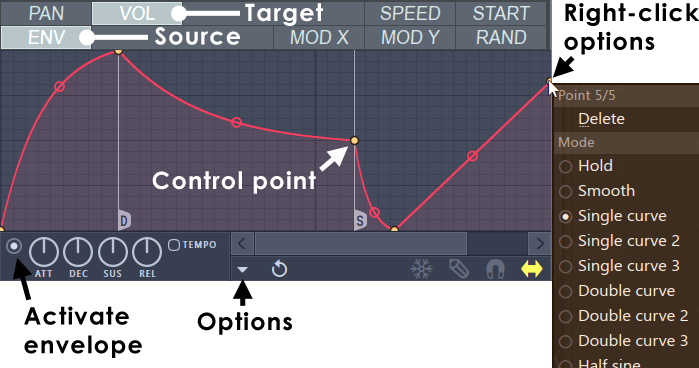
- Envelopes - Associated with each articulator are a number of envelopes. There are two rows of tabs, the top row selects the modulator target while the bottom row selects the modulation source.
In other words, for each target in the top row there are a range of sources affecting how that target is modulated below.
Modulation targets include:
- PAN - Affects the stereo panning of the bank.
- VOL - Affects the volume output of the bank.
- CUT (Filter Cut) - Affects the filter cut-off frequency of the bank. This interacts with the CUT parameter (above) and the filter type switches.
- RES - Affects the resonance of the filter selected.
- SPEED - Playback speed. Scratching: This envelope can be used to go forwards/backwards in time. To pause playback use a setting of -25%. Below this setting the sample will play backwards. Normal reverse speed is a setting of -50%. Curved lines will create accelerations or decelerations in speed.
- START - Playback start position. There are Options > Settings to limit the variability to the first 100 ms or allow this to vary over the entire sample duration.
Modulation sources may include:
- ENV - General purpose envelope.
- LFO - An Low Frequency Oscillator (LFO) envelope.
- VEL - Velocity as a modulator (usually used with VOL) . Input velocity is on the horizontal axis, low input velocities (0%) to the left, high (100%) to the right. Playing a note with this envelope open will show the current velocity as vertical line.
- MOD X - Determines how the X parameter of integrated X/Y controller responds to X position changes.
- MOD Y - Determines how the Y parameter of integrated X/Y controller responds to Y position changes.
- RAND - Random number generator. A random number is selected in the range of 0% to 100%. The envelope defines how the random number relates to changes in the controlled property. The value of the envelope at a particular location defines how likely the value will be selected by the random generator, allowing you to fine tune the behavior or the random generator and effectively defining the "chances" of certain values being selected.
Working with envelopes
The envelope editor allows you to create infinitely complex envelopes. Select the envelope target (upper row) and envelope source (lower row) tabs then edit the envelope as follows:

NOTE: To activate envelope select the switch as shown above. Deselecting it will disable the envelope.
Graphical Curve Editing
There are several basic operations for editing the envelope/mapping shape:
- Add a new Control Point - Position your cursor over the line until the add point cursor appears
(
 ). Right-click and a new point will be added.
- Reposition a Control Point - Drag control points using your left mouse button. Hold SHIFT while dragging to lock the vertical position, or CTRL to lock the horizontal position.
- Delete a Control Point - Right-click a control point and select Delete. Alternatively, hold ALT and Left-click.
- Change a tension curve type - The editor offers 5 types of curve types for joining control points. To open the menu, Right-click a
control point (the selection applies to the preceding segment):
- Single Curve - Default mode for creating linear, ease-in and ease-out curves (depending on the tension).
- Double Curve - Smooth 'S' curves.
- Hold - Single steps between points, handy for creating abrupt value changes in the envelope.
- Stairs - Multiple steps between the control points. Left-click on the tension handle and move your mouse up/down to change the step frequency.
- Smooth stairs - Multiple smooth steps between the control points. Left-click on the tension handle and move your mouse up/down to change the step frequency.
- Change Segment Tension (Acceleration) - To change the amount of tension, Left-click on the tension handle (the circle located half way between the control points) and move your mouse up/down. Right-click the handle to reset to a straight line. Hold CTRL during adjustments to fine-tune.
ADSR Envelope Knobs
Although many envelopes are pre-defined with 'attack', 'decay', 'sustain loop start' and 'sustain loop end' control points you can Right-click a control point to set control point types in the graphic envelope editor. Once control points have been defined, the knobs act as multipliers, for each section.
- Attack (ATT) - Defines the attack length/speed.
- Decay (DEC)- Defines the sustain section length/speed.
- Sustain (SUS) - Defines the sustain section slope ("decay" amount).
- Release (REL) - Defines the release length/speed.
- Tempo - Lets you determine whether the envelope length is relative to the project tempo (changes with tempo) or absolute in time.
NOTE: When adjusting ADSR properties the display will preview the effect of the knob value on the envelope shape. Once the mouse key is released the envelope is restored to its previous view. This allows you to set a basic envelope shape and modify it quickly. Alternatively you are free to hand-draw the entire envelope.
Option menu
- Open state file / Save state file - Opens/saves envelope states. Several different pre-defined state files are available.
- Copy state / Paste state - Use this to copy and paste envelopes, usually between instances of the EQ editor across open plugins.
- Undo - Undoes the last envelope edit.
- Undo history / Last reset - Shows the editing history since the last reset.
- Flip vertically - Inverts the current envelope.
- Scale levels - Opens the Scale Level tool.
- Normalize levels - Scales the envelope so the highest and/or lowest levels reach +/- 100%.
- Decimate points - Opens a simple tool that allows manipulation of the number of control points in the envelope (useful in conjunction with Analyze audio file).
- Filter - Opens the Envelope Filter tool (useful in conjunction with Analyze audio file).
- Smooth up - Opens the Smooth Up tool that allows smoothing of the envelope shape (useful in conjunction with Analyze audio file).
- Smooth up abrupt changes - Quick removal of 'spikey' or sudden changes in the envelope.
- Turn all points smooth - Preset filter to quickly filter the envelope.
- Create sequence - Opens the Envelope Sequencer tool.
- Analyze audio file - Open, analyze and replicate the volume envelope of an input sound file. Drag and drop audio files directly on the Envelope editor for automatic analysis.
- Background gradient - Flips the background gradient shading vertically.
Switch settings
Along the lower-right edge you will find a number of control point options:
- Freeze - Enable this switch to lock the envelope curve to its current setup. This feature is useful if you have finished changing the spline structure of an envelope and want to protect it from accidental edits (it also hides the handles to provide a clear view of the shape).
- Step - Enable this option to set the Editor to step editing mode. Drag within the editor to create a 'free hand' curve in which a new control point is defined for every step in the timeline. Hold SHIFT while dragging to draw 'pulse' lines (straight vertical/horizontal lines only). Note that each new segment created in this mode uses the same tension as the previous segment.
- Snap - Enable this option if you want the control points to snap to the nearest step in the timeline while dragging.
- Slide - Enable this option to preserve the relative distance between a dragged control point and all control points after it (this option is enabled by default).