INSTRUMENTS / GENERATORS
MiniSynth
MiniSynth is a fully featured synthesizer with a low processor overhead and great sound. There are 6 tabs covering the synthesizer controls making it perfect when working with a touch interface (for which it was designed) or for the new user learning how to program synthesizers. MiniSynth is also included with FL Studio Mobile and is used when converting FL Studio Mobile projects to FL Studio format. Even if you don't use FL Studio Mobile, you will find MiniSynth a great addition to your library and you can still share patches with FL Studio Mobile users on the MiniSynth presets & programming forum.
See the video tutorial ![]() here.
here.
TIP: Create patches using MiniSynth in FL Studio and save them for use in FL Studio Mobile, so you can take the same sounds on the road with you.
MiniSynth Controls
Controls are spread across 6 tabs making them perfect for touch-screen control.
Oscillator
Oscillators are the sound source for the synth. MiniSynth has an advanced multi-mode oscillator that changes architecture depending on the waveform selection. Some waveform modes are dual-voice where two waveforms are mixed. Other modes can be up to 8 voices. A voice is a single, pitchable tone.
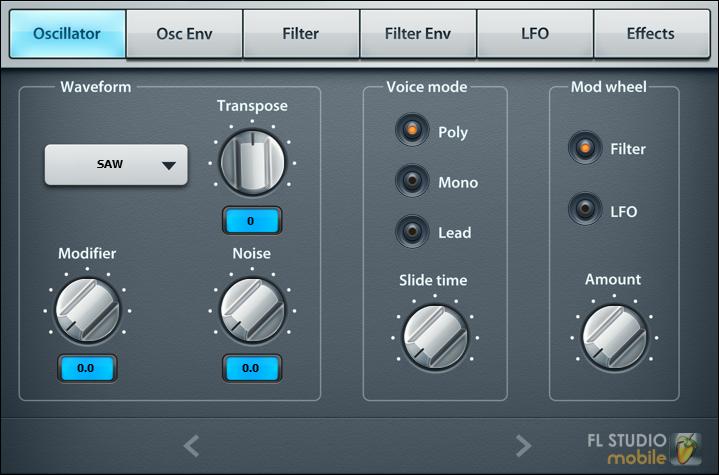
- Oscillator - Controls for the waveform shape and pitch.
- Waveform - Choose the wave-shape. Depending on the selection there are some unique behavior of the voices.
- Saw - A Saw + Square wave of the same frequency and phase. Modifier controls pulse width of the Square wave, so in positions 0 or 100 pulse width becomes zero and a perfect Saw wave is produced.
- Saw + Saw - Pair of Saw waveforms. Modifier controls pitch of the second saw +/- 24 semitones.
- Pulse - Pair of Square waveforms. Modifier controls pulse width of the waveform so that at 0 or 100% there is complete phase cancellation.
- Square + Saw - Square and Saw wave. Modifier controls pitch of the saw +/- 24 semitones.
- Square + Square - Pair of Square waveforms. Modifier controls pitch of second square +/- 24 semitones.
- SuperSaw - 8 Saw waves panned in the stereo field. Modifier detunes the 8 voices.
- Bell - Saw-like waveform. Modifier - adds in additional spectral frequencies.
- DeafSaw - Two Saws with same frequency. Modifier - Adjusts phase shift of the Saw waves relative to each other creating a 'comb filter' effect.
- Spread 1 - 3 Saw waves at -1 octave, 0 octave (root) and +1 octave intervals. Modifier adjust the detune of the chord.
- Spread 2 - 3 Saw waves at 0 octave (root), 5th and +1 octave intervals. Modifier adjust the detune of the chord.
- Transpose - Transpose the oscillator +/- 12 semitones.
- Modifier - Action depends on the selected waveform type, see above.
- Noise - Adds white noise (hiss) into the mix.
- Voice Mode - Polyphony (ability to play more than one note) and voice transitions.
- Poly - Polyphonic, play up to 8 notes.
- Mono - A monophonic mode (one note playback), slides always sound on note changes and envelopes reset.
- Lead - A monophonic mode where auto-portamento is enabled (when notes overlap) and the envelopes are not retrigged. This allows you to play normal lead melodies without the slide (portamento) effect and then add it where you want by holding the previous note before playing the next.
- Mod Wheel - Select Modulation targets. NOTE: Mod Wheel is only available when a MOD Wheel MIDI controller is connected.
- Filter - Modulation will affect the filter cutoff.
- LFO - Modulation will affect the LFO speed.
- Amount - Multiplier for the Mod wheel effect.
Oscillator Envelope
Oscillator Envelope controls. The ADSR envelope provides a volume envelope (volume changes) at key on, key held and key release. These controls are how you would make a note play on after you release the key or to soften the attack of a sound, for example.
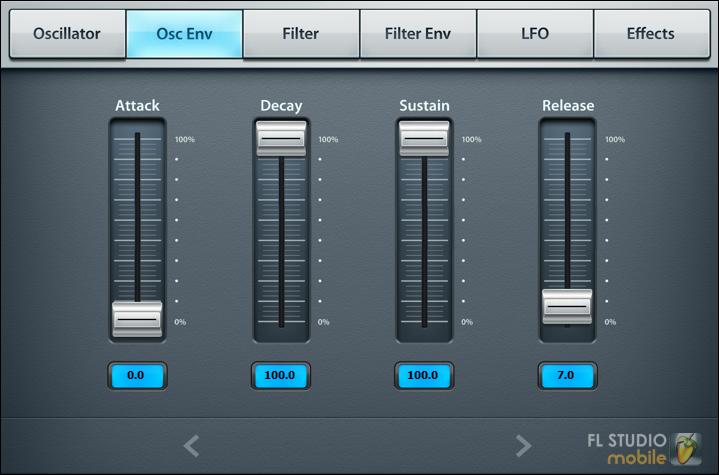
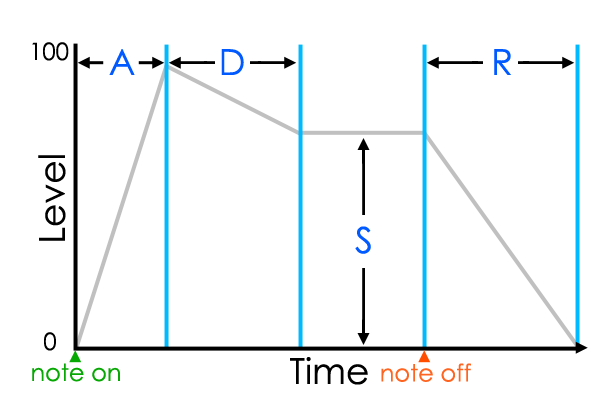
To better understand ADSR controls it's useful to have in mind that for any note there are three basic timing events, 'note on' event, 'note hold time' and 'note off' event.
- Attack - Time taken for the filter to reach the maximum level.
- Decay - Time taken to go from the maximum level to the Sustain level.
- Sustain - Level when the key is held.
- Release - Time taken to fall from the Sustain level to zero when the key is released.
ADSR Diagram
Filter
MiniSynth uses a single Low Pass filter with cutoff and resonance controls. Low Pass filters allow frequencies below the cutoff frequency to pass. When set to the highest frequency this means all frequencies can be heard. When set low, only the lower frequencies will be heard.

- X/Y Control - Horizontal - Filter cutoff frequency (the filter is of the low pass type), Vertical - Resonance. This causes a peak at the cutoff frequency that is most noticeable when the cutoff frequency is changed.
- Keyboard - Filter Cutoff frequency can be set to increase (turn right) or decrease (turn left) with keyboard position. This is useful to open or close the filter as you progress up the keyboard, so higher keys are brighter sounding for example.
- Velocity - The filter be set to increase (turn right) or decrease (turn left) with keyboard velocity. This is useful to open or close the filter as you play louder notes, so keys played hard (high velocity) are brighter sounding for example (keyboard velocity is simulated by vertical play position).
Filter Envelope
The (ADSR) envelope controls modulate with the Filter Cutoff frequency. NOTE: The Amount knob will determine if the ADSR controls increase or decrease the values of the filter cutoff.

To better understand ADSR controls it's useful to have in mind that for any note there are three basic timing events, 'note on', 'note hold time' and 'note off'.
- Attack - Time taken for the filter to reach the maximum level.
- Decay - Time taken to go from the maximum level to the Sustain level.
- Sustain - Level when the key is held.
- Release - Time taken to fall from the Sustain level to zero when the key is released.
- Amount - Amount of envelope to filter cutoff modulation. Turn right for positive modulation and left for negative modulation (-/+ 100%).
ADSR Diagram

Low Frequency Oscillator (LFO)
LFO's are a modulation source that can be used to create interesting effects by slowly varying the values of other parameters.
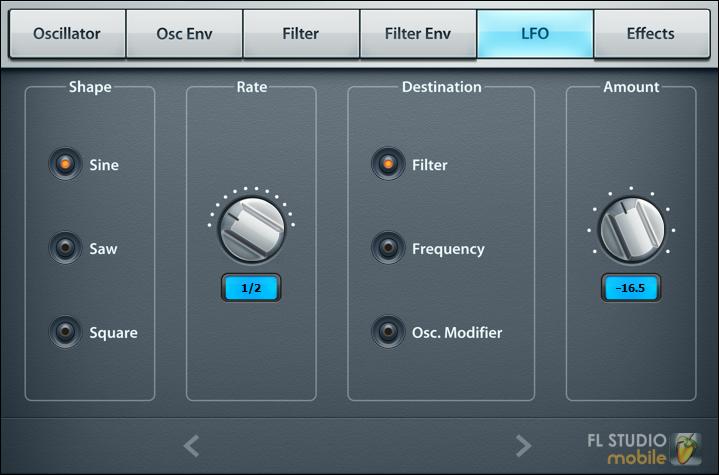
- Shape - Shape of the LFO waveform. Choose from:
- Sine that produces a smoothy varying shape.
- Saw which has a sharp attack and linear decay, like a 'Saws teeth'.
- Square that flips between two states.
- Rate - Frequency of the LFO repeat period. These are tempo-synced.
- Destination - Choose the modulation target of the LFO waveform:
- Filter - Filter cutoff frequency.
- Frequency - Oscillator pitch or tune.
- Oscillator - Oscillator modifier.
- Amount - Amount of LFO to destination modulation. Turn right for positive modulation and left for negative modulation (that is to invert the waveform, -/+ 100%).
Effects
There are four effects tabs. These are separate from the main track FX.
Delay
Delay is an echo style effect and is particularly effective when played in sync with the main tempo of the track.
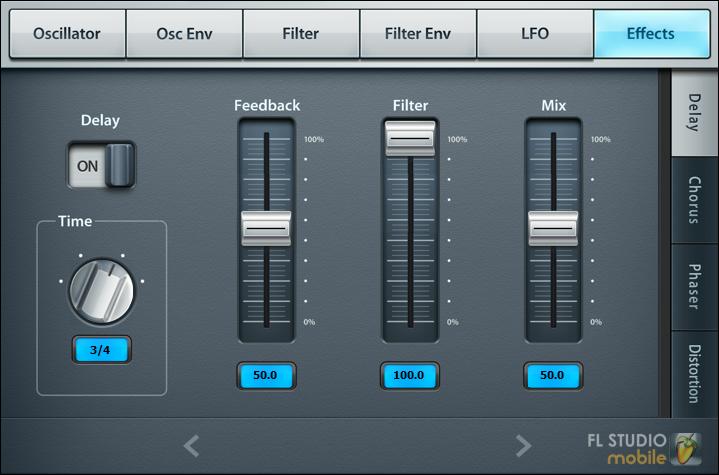
- Time - Tempo synced delay time.
- Feedback - Number of echoes.
- Filter - Amount of high frequency filtering applied to each round of echoes.
- Mix - Echo volume.
Chorus
Chorus creates a thicker/lusher sound by detuning multiple voices within the sound.

- Rate - LFO speed for the modulation of the chorus effect.
- Mod - Depth (detune) of the Chorus effect.
- Mix - Amount of chorusing heard.
Phaser
Phasing modulates the relative phase of the dual-voice oscillators. Oscillator voices are delayed by different amounts, causing a moving frequency cancellation effect that you will recognize even if you don't really understand how it works ;)

- Rate - Tempo synced LFO style modulation speed of the phase effect.
- Width - Min/Max frequency range for the sweep effect.
- Feedback - Some of the phaser output can be fed back into the effect to create resonances, similar to resonance (Q) on a filter.
- Frequency - Center frequency around which the phase inversion occurs.
- Mix - Amount of phasing heard.
Distortion
There are two distortion effects. Overdrive which simulates the distorted sound of guitar amplifiers, for example and Decimator for vocal formant style or digital bit-depth type sounds that can make MiniSynth sound like an old-style video game or broken CD player.

- Overdrive - Guitar/Amplifier style distortion.
- Decimator - Digital style distortion.
Sharing MiniSynth Presets With FL Studio Mobile
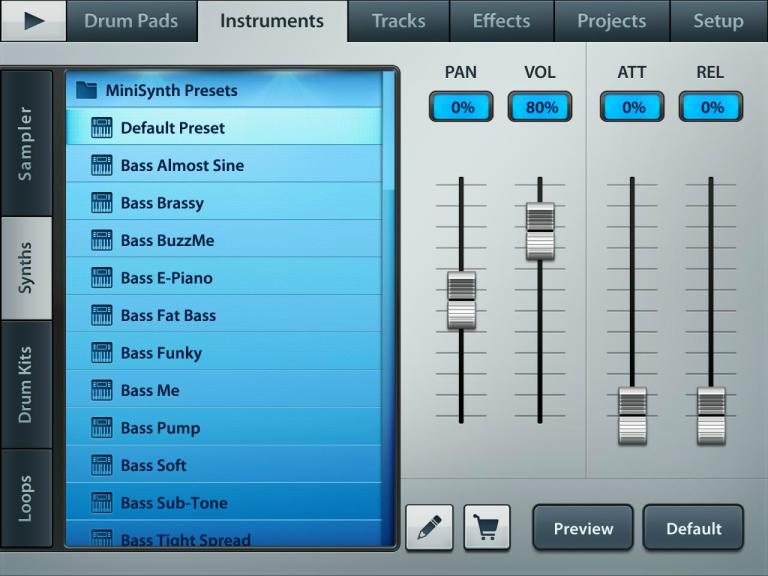
You can save patches/presets from MiniSynth and load them in the FL Studio Mobile version and vice versa. Why not visit the MiniSynth presets and programming forum where you can download and share MiniSynth presets with others, even if you are not using FL Studio Mobile. Save to *.flms format rather than .fst format to maintain inter-application compatibility. The following instructions explain how to load .flms presets in FL Studio Mobile:
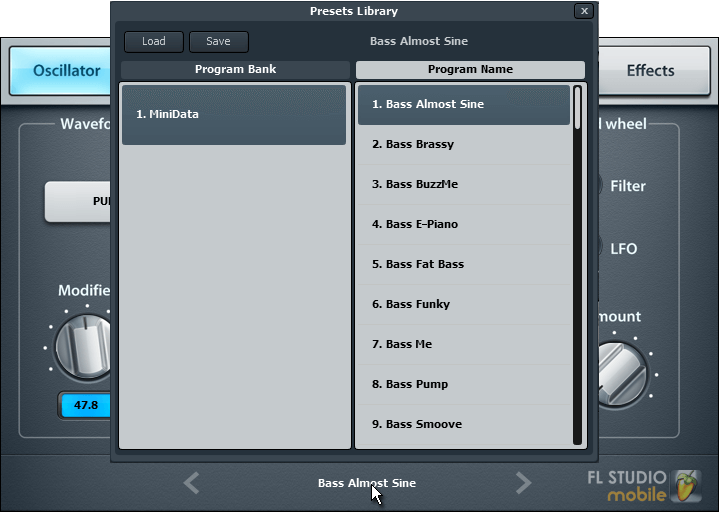
Click the preset name to open the browser and use the Load/Save functions here to import/export *.flms format
Using .flms Presets with FL Studio Mobile
FL Studio Mobile 3 changes the appearance of MiniSynth, but it remains identical in terms of sound generation, so patches remain interchangable with the FL Studio Plugin version of the Synth.
WiFi Transfer
See the FL Studio Mobile page on Sharing Data.
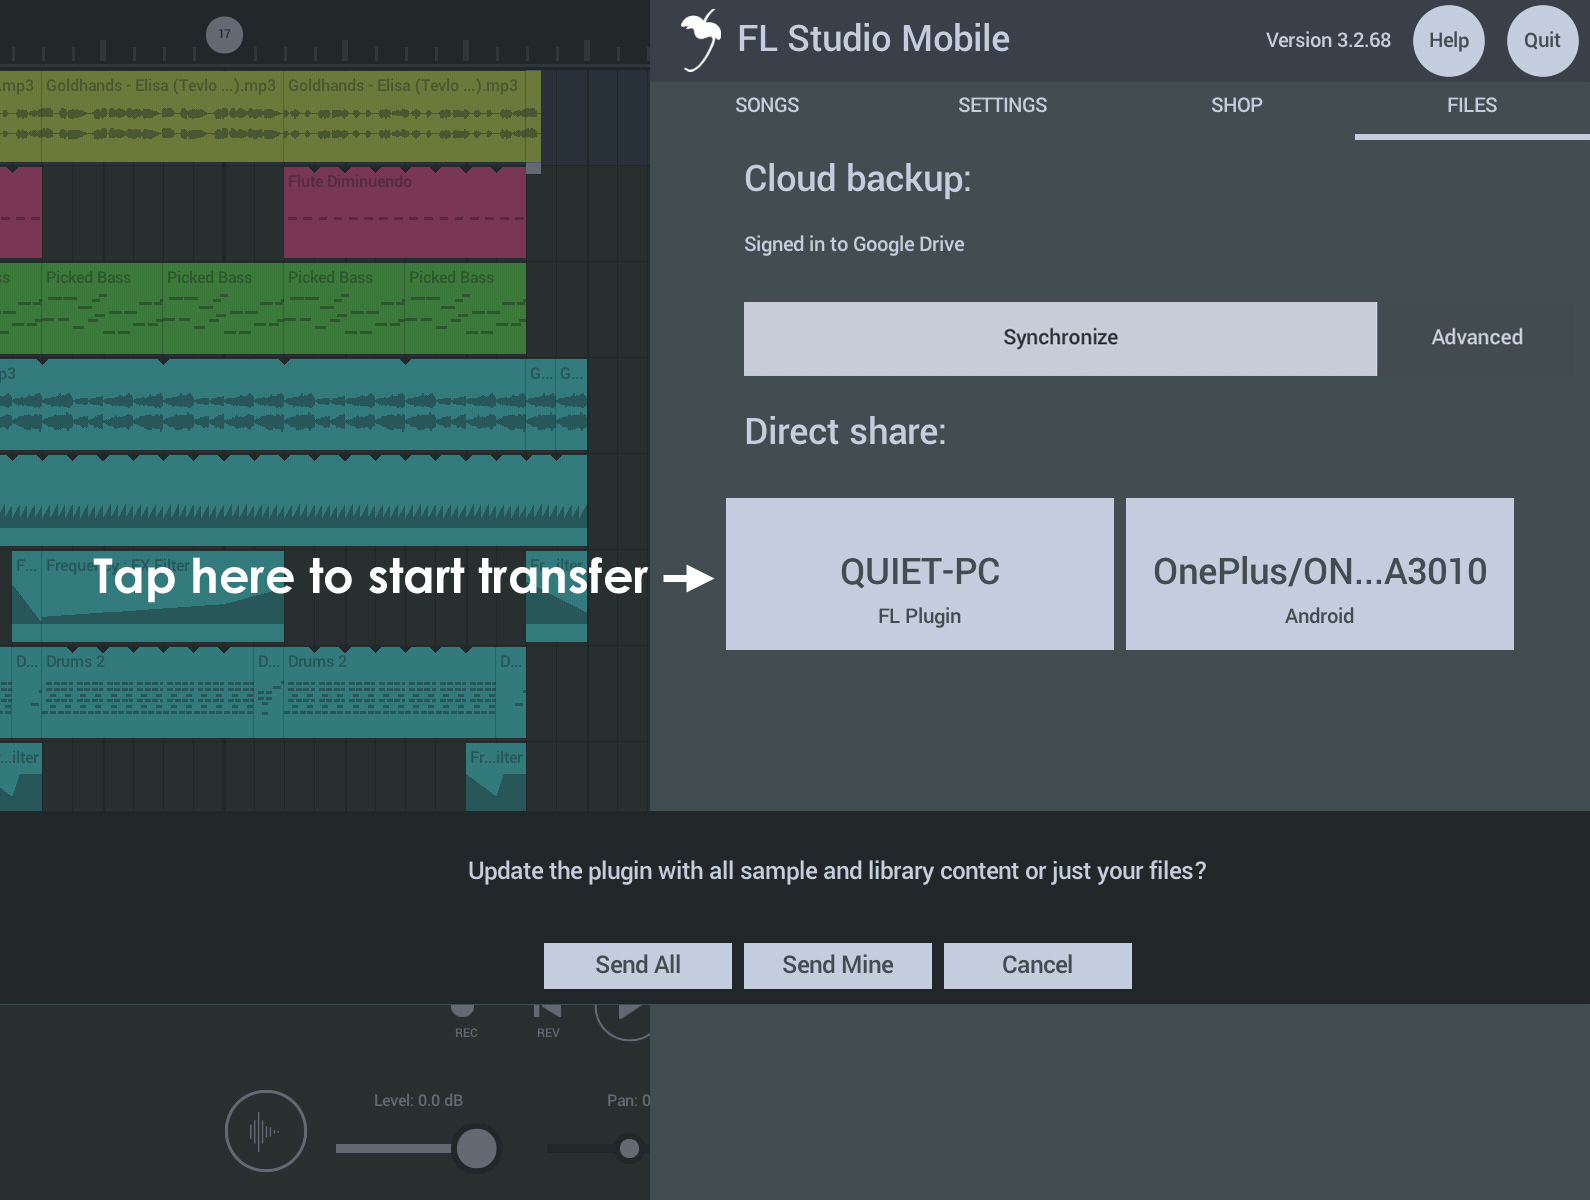
Copy presets from PC to Mobile installations:
- Open the MiniSynth preset folder - Right-click the MiniSynth Preset Selector to open the preset manager. Click Save to open the save location.
- Copy presets - Copy the .flms presets from this folder into the FL Studio Mobile FL Studio plugin folder: ..:\Program Files (x86)\Image-Line\FL Studio\Plugins\Fruity\Generators\FL Studio Mobile\LocalData\My Presets
- Share the presets - Open the FL Studio Mobile plugin in FL Studio and on your mobile device. Perform a SHARE operation FROM your PC.
Copy presets from Mobile to PC installations:
- Share the presets - Open the FL Studio Mobile plugin in FL Studio and on your mobile device. Perform a SHARE operation FROM your mobile device.
- Copy presets - Copy the .flms presets from your FL Studio Mobile FL Studio plugin folder: ..:\Program Files (x86)\Image-Line\FL Studio\Plugins\Fruity\Generators\FL Studio Mobile\LocalData\My Presets to:
- Open the MiniSynth preset folder - Right-click the MiniSynth Preset Selector to open the preset manager. Click Save to open the save location. This is the destination for the imported presets.
NOTE: You can also use MiniSynth inside the FL Studio Mobile plugin without the need to perform the 3rd step.
Plugin Credits:
Maxx Claster exclusively for - Image Line Software
