INSTRUMENTS / GENERATORS
Programming Ogun
A general introduction to Ogun programming using the TIMBRE and Timbre mapping controls as shown below:
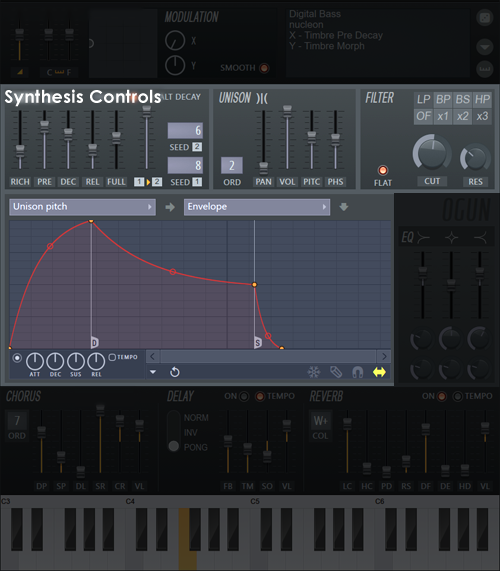
Click on the following sections to open
Main Page
Master Controls
Synthesis Controls
Effects Controls
Programming Ogun
At the heart of Ogun is an 'Additive synthesis' engine. Additive synthesis creates sound entirely by combining sine waves of various frequencies and phases. Fourier Theory teaches us that any waveform can be decomposed into a fundamental pitch and then a (usually large) number of sine waves that are multiple frequencies of the fundamental, a harmonic series. In the two pictures below, the harmonics are represented by vertical bars, height is amplitude horizontal position is frequency, just like a graphic equalizer, however in this case the frequencies on each slider are exact multiples of the root note. Let's start by taking a look at additive synthesis, using some screenshots borrowed from Image-Lines Sytrus , additive synthesis interface:
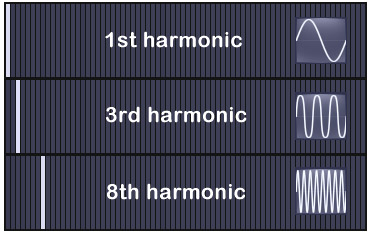
The 1st harmonic (fundamental frequency) is controlled by the note played and is the exact pitch of that note. The 3rd harmonic is 3x the fundamental, so if A440 (440 Hz) was played the 3rd harmonic would be 1320 Hz (440 x 3), the 4th 1760 Hz (440 x 4), etc. The exciting part for anyone with a passing interest in Synthesis (that's you), is that combining harmonics and in the right amplitude and phase relationship, any complex waveform is possible, yes even including square waves as shown below. NOTE: Ogun randomizes phases and does not offer control over them as they are usually not required for metallic timbres (trust us, you don't want to start editing phases, it will drive you insane!).
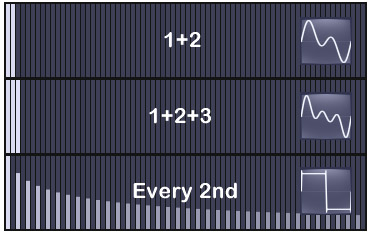
Looks complex, so how are you going to know what harmonics to activate to achieve a particular sound? The short answer is that you don't need to. While the heroic can use Ogun to create simple waveforms (try making a simple Sine wave sound to start), it has been designed primarily for lush metallic sounds that require general shaping of complex harmonic spectra, rather than tweaking of individual harmonics. For example, cymbals are difficult to reproduce by ordinary synthesis techniques because they are rich in harmonic frequencies. Ogun can generate up to 32,767 harmonics, so cymbals are no problem, however to prevent you being lost in a sea of individual harmonic controls, broad-brush tonal shaping is provided by the TIMBRE section and Harmonic mapping curves (think EQ curve). The next section will guide you through these controls in more detail.
Shaping the Harmonic Spectrum
This covers the most significant tonal controls in Ogun, in particular the TIMBRE controls and Envelope mappings.
The timbral controls
- Default & Default(tonal) presets - While not strictly a control, starting with one of these two presets will save you a lot of work. The Default patch is a good starting point for non-tuned metallic
sounds, and as the name suggests, the Default(tonal) patch is a great starting point for tuned sounds. So what's the main difference between these two patches?
The Default and Default(tonal) patches differ mainly in the number of active harmonics. Open each one in turn and watch the RICHness slider. It's a fact that the lower harmonic frequencies (first 25 or so) are most dominant in our perception of pitch, while those above (100, in combination) add brightness/presence, and that is exactly what happens in the Default patch, the upper harmonics overwhelm the lower ones. So let's have a look at the RICHness slider in more detail.
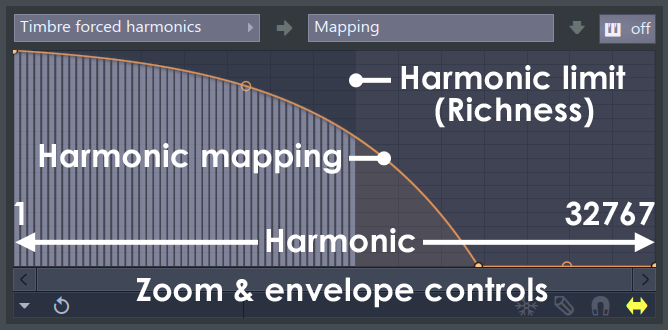
- Rich - The RICHness slider controls the number of harmonics activated. If you look at the screen-shot below, the upper harmonic limit shows as a shaded region. Load the Default patch and move the slider up and down while playing notes. At the lower limit 31 harmonics are active at the upper limit, all 32,767 play (watch the hint bar as you move the RICHness slider). For tuned sounds use 256 (or less) or more for the noisy/metallic sounds. You probably also noticed that the pitch of a given note drops as the RICHness setting is increased. This happens because the root note is automatically rescaled downward so that the highest harmonic frequencies (above the note) can be used, otherwise most of them would fall above the range of hearing, good for dogs, not good for people. So how do you shape the harmonic spectrum? With the Timbre equalization mappings:
- Timbre equalization - The purpose of the Timbre equalization mappings is to modify the spectral distribution set by the Seed 1 & 2 generators. The screenshot below shows the curve for the 'Timbre forced harmonics'
target. NOTE: The harmonic 'bars' have been added for illustration purposes and don't appear on the Ogun interface.
A unique harmonic mapping curve can be set for each of the following targets:
- Timbre forced harmonics - The 'Timbre forced harmonics' mapping curve is a fail-safe, that forces the selected harmonics to the level set by the curve. This is important as the Seed 1 & Seed 2 spectra may turn any given harmonic off (or to an unacceptably low value). One common reason for using this mapping curve is to force the first few harmonics to always sound as they are crucial in the perception of pitch. The vertical scale is a multiplier value that goes from 0 (off) to 1 (100%), keep an eye on the Hint bar as you move nodes.
- Timbre impulse EQ - This modifies the starting harmonic EQ curve. To hear this equalization curve more clearly push the DECay slider to maximum, this will prevent the decay curve from kicking in.
- Timbre decay EQ - This curve changes the harmonic spectra during the decay phase of the note. It is useful in creating a spectral change in the sound over time (although the filter envelope is also useful for these type of effects).
- Timbre release EQ - Modifies the spectral curve for the sound after the note is released. NOTE: You can force the Decay EQ to run straight into the Release EQ by setting the Option menu setting Link timbre release to volume decay, ON.
- Full - This slider blends between the output of the Seeded harmonic spectrum (bottom) and the full harmonic spectrum (top), as limited by the RICHness control. To hear this effect most clearly select the 'Default(tonal)' patch and slide the control all the way to the top and back down again, leave it down as we explore the next control.
- 1->2 - Timbre morphing / randomness. This controls the relative blend between the spectra created by Seed 1 and Seed 2. For example, set Seed 1 = '1' and Seed 2 = '10' move the 1->2 slider between the bottom (Seed 1) to the top (Seed 2). A given seed will always create the same harmonic spectrum, there are 9999 to explore! Remember, however a given spectra of Seed 1 or 2 may have important harmonics set to values that you do not want. In this case use the Timbre equalization Mapping curves to re-shape the spectra to your liking.
- Seed 1 / Seed 2 - As noted above these controls generate two independent weightings for the harmonic spectra (within the upper limit of the RICHness setting). However there are a few special
cases worth considering:
- When Seed 1 or 2 is set to '----' - all harmonics will play within the limit of the RICHness setting. Set both to '----' and slide the 1->2 control between Seed 1 & 2 and convince yourself that they both sound the same (bright, all harmonics on).
- Leave Seed 2 = '----' and set Seed 1 to any numerical value. Slide the 1->2 control 1/2 way so you are listening to a blend of both seeds, now keep hitting the same note and hear the subtle variations. This arrangement randomizes the Seed 1 spectra each time a key is played.
Ogun workflow
We will walk through synthesis in Ogun, starting with the Default preset, to give you a general 'top-down' work-flow.
- Start with the Default preset - Assuming you have the preset titled 'Default' selected, a flat timbre is created (the basis of metallic sounds). This timbre is flat noise, up to the harmonic limit set by the RICHness slider, and is generated by the Timbre Seed controls.
- Metallic or noisy timbre - At this stage you can modify the harmonics with the FULLness & PREdecay sliders to create a more or less metallic-sound. Push the FULLness
slider up to make the Timbre more noisy and the PREdecay slider up for more 'metallic' timbres. However, overall the sound is still a flat, in the sense that the harmonic spectrum has no equalization trends
or movements.
At this point the spectrum will sound like a 'splashy hiss'. It's worth noting that noise is a combination of many frequencies, so it's not surprising that the sum total of the first 8,000+ harmonics in the Default preset sounds like noise. Experiment with the RICHness slider and drag it down, as you do so watch the Hint bar where the total number of harmonics are shown. Listen for the point where the noise starts to develop a clear pitch. You should find that adding more than about 500 harmonics (setting 5), causes the spectrum lose its 'pitch', this is why we say that the upper harmonics are associated with brightness, those above 500 or so. This is also the reason why we are not particularly concerned with individual manipulation of the last 36,000, or so, harmonics since they don't have a dramatic impact on the tone of the sound and only add subtle brightness /presence coloration. You may have also noticed the root note (pitch) is also scaled upward as the RICHness slider is moved downward, this is to keep the lower harmonics in a useful (playable) range. Put the RICHness slider back to a setting of 9 (8,191 harmonics).
The keen eared among you will have noticed that repeated pressings of the same note cause slight variations of the 'splashy hiss' (listen carefully). This is caused by a special randomization function activated when Seed 2 = '----'. To hear this randomiztion the 1->2 (Timber morphing) slider to the top (100% Seed 2). A new, random 'Seed 2' harmonic spectrum is generated for each note-on event. Drag the 1->2 all the way down to hear only Seed 1 and note how static the splashy hiss is. Return the slider to 30%.
- Pitched or unpitched sound - If you want to create a clearly pitched sound, special attention needs to be paid to the lower harmonics. These are, individually, far more important to the perception of pitch than the higher harmonics, that are responsible for brightness. First, you will need to select a RICHness that allows the lower harmonics to dominate the sound (try 255 harmonics or less), then you can also 'force' specific lower harmonics on, using the Timbre forced harmonics mapping. Remember that the lower harmonics in the Seeded spectrum may be at any level between 0% (off) and 100% (fully on), so the effect of a Forced mapping will vary depending on the starting (random) state of the harmonics. Generally you don't need to force harmonics for metallic, noisy presets.
- Harmonic equalization - At this point you will have a relatively metallic, but bright and sustaining sound. The timbre can be equalized with the Timbre impulse EQ, Timbre decay EQ and Timbre release EQ mappings. These function like any equalization, that is to change the tone of the sound. The Timbre impulse EQ sets the starting timbre then the Timbre decay EQ mapping kicks in, as the timbre progressively decays and finally to the Timbre release EQ on note release. NOTE: In normal decay mode (default) the Timbre decay mapping is a modifier of how long it takes each harmonic set by the Timbre impulse EQ to decay to 0. In Alt decay mode the Timbre decay mapping is treated as an EQ mapping, that is an explicit level to which each harmonic in the Timbre impulse EQ will decay (in other words, now a 'decay-to' level rather than decay time).
- Adding unison & effects - Finally, once you have tuned the Timbre, unison voices and effects can be added, to taste.
Resynthesis
Resynthesis is the process of analyzing an input sound and automatically recreating that sound within the relevant synthesis architecture. You can substitute resynthesis for steps 1 to 4 above. Ogun will resynthesize .wav samples into two harmonic mappings, one for the start of the sample (Timbre impulse EQ) and another based on the end of the sample (Timbre decay EQ). By morphing between these harmonic mappings the original harmonic motion is captured, however the accuracy will depend on the length and complexity of the sample. In other words, Ogun is designed to capture the timbral essence of input sounds, not recreate Beethoven's 5th symphony. If complex resynthesis is a priority, we recommend Image-Line's Morphine additive synthesizer.
The sample - Only .wav files can be used. Ogun uses embedded MIDI root-note data (if available) to set the pitch of the resynthesized preset. Edison can be used to analyze and/or set the root-note meta-data in the .wav file if necessary. C5 is used by default if no pitch data is contained in the .wav file.
For resynthesis of simple timbres try the following:
- Make sure the ALT DECAY option is OFF.
- Open the sound to be resynthesized in an audio editor such as Edison.
- Take a selection from around the beginning of the sample that is most representative of the timbre you are seeking.
- The RICHness setting will define how many harmonics are used in the resynthesis. Ideally, use the lowest number of harmonics to achieve the sound you need since CPU load of the final sound grows with the Timbre EQ mapping point count. Preset the RICHness slider to around 511 harmonics, increase it if you don't like the result of the next step.
- Drop the sample onto the TIMBRE section of Ogun's user interface to start the resynthesis OR use the Resynthesis from the Options Menu.
- Play the sound and adjust the DEC slider so that the sound decays in a natural manner. Try the sound with ALT DECAY ON.
For resynthesis of complex evolving timbres try the following:
- Make sure the ALT DECAY option is ON.
- Preset the RICHness slider to around 2047 harmonics, increase it if you don't like the result of the next step.
- Drop the sample onto the TIMBRE section of Ogun's user interface to start the resynthesis OR use the Resynthesis from the Options Menu.
- Play the sound and adjust the DEC slider so that the sound decays in a natural manner. Try turning ALT DECAY OFF.
NOTES: 1. An alternative Step 1, is to resynthesize with ALT DECAY ON, to transform an existing timbre, then turn it OFF after the timbre is captured. 2. If the current timbre is resynthesized (Seed 1 set to '----'), then the PREdecay (& FULLness won't have any effect.
Programming Tips
- Default patches - When programming from a 'clean slate' it is helpful to use the 'Default' patch to create atonal metallic presets and 'Default (tonal)' to create tuned presets.
- Timbre controls - The controls in the Timbre section randomize, shape and modulate the harmonic spectrum.
- Richness limit - The 'Richness' setting is reflected in the harmonics editor by the variable shading.
- Atonal sounds - Presets with high harmonic counts more easily lead to noisy metallic (atonal) sounds.
- Tonal sounds - Lower harmonics are most important for a clear 'pitch'. The 'Timbre forced harmonics' Editor is useful to force all the lower harmonics to sound. Similarly low RICHness settings will limit the sound to the lower harmonics.
- Randomizing the harmonic spectrum - Setting Seed 1 to '----' will turn all harmonics on. Setting Seed 2 to '----' creates randomness, set the morphing slider toward Seed 2 to add randomness.
- Harmonic shaping - Turning the 'Natural EQ mapping scale' off will allow better control over all harmonics. Points snap to the mapping scale. However, note that it is difficult to manually edit the large number harmonics in many Ogun presets.
- Articulations - Refer to those envelopes that modify parameters while a voice is playing. For example, a filter's cutoff freq can change over time.
- Mappings - Modify parameters that are set once at voice-trigger time. For example, the timbre fullness is only used to compute the initial voice timbre, thus it doesn't make sense to change it over time. Some parameters also only have mappings, and not envelopes, because it would be too CPU-intensive to change them over time.
- EQ mappings - Are, by default, traditional EQs, in an octave scale for the horizontal axis. This means that the mapping does not linearly represent harmonics, far from it (the first octave represents 1 harmonic, the last one represents 16000). However, you can optionally switch to a linear harmonic scale from the Options menu. The Timbre analysis switches to this mode automatically.
- Envelope backgrounds - As with other Image-Line plugins, pay attention to the Envelope Editor's background gradient (when the option is enabled) and the envelope filling color, these indicate if the envelope is a multiplier or a linear offset. This is particularly important, as you don't set up mapping for the envelope fullness (offset) as you do for morphing (multiplier). An envelope for the morphing will always go from 0 to the current morphing value, while an envelope for the fullness will add to the current fullness.
- Decay time - Maximum decay time = no decay (infinite). There is no infinite release.
- Processing quality (Options menu) - The processing quality is set to 'Waste of CPU' automatically in the FL Studio version, but not for the VST version (the VST standard does not communicate the Hosts rendering status to the plugin), so use the Rendering mode option on the Hint Bar.
- Looping? - You may notice some sounds, particularly resynthesized ones, have a looped quality (pulsing or repeating sound) without any envelopes or delays used. As the length of this waveform is defined by the lowest harmonic, the higher harmonics may seem to repeat each time the fundamental harmonic repeats, leading to the 'looped' effect. If you hear strong looping then it probably means you have a sub-sonic (long duration) fundamental in the timbre.
Filter Section
So far we have discussed tonal shaping using the TIMBRE and Timbre mapping controls. The filter section is also a powerful tonal shaping tool and should not be overlooked. Rather than go into details about all the possibilities with filtering, let's consider a preset that makes use of the filter section and distinguish the filter sound from the TIMBRE and Mapping control effects.
A unique characteristic of metallic objects is the way the harmonic spectrum changes over time. For example, a Gong is often characterized by an initial attack dominated by the lower harmonics, but as these harmonics die away the higher harmonics continue to ring on, creating that classic "Bawoosh" sound. Perhaps, we need to open the preset titled "Gong" (by Gol) and hold down a note to hear what "Bawoosh" sounds like.
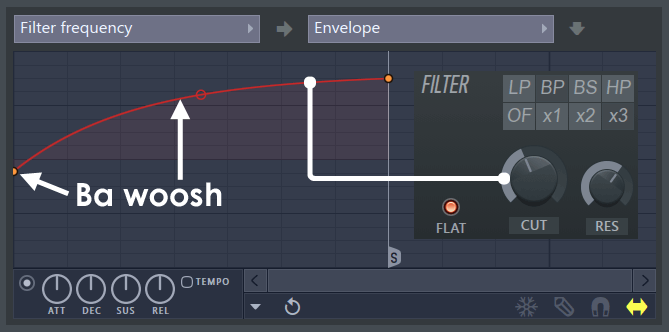
There are two main things happening in this preset, first when a key is pressed there is a lower, almost 'pitched' attack sound, then followed by a brighter shimmering sound as the key is held. To hear the two main tonal components of the sound play a key with the FULLness slider all the way to the bottom (there's the more resonant, almost pitched attack), then with FULLness all the way to the top, to hear the dominant higher harmonics of the sustain. Reload the preset to return the FULLness control to the original position.
So where does the tonal motion come from as the key is held? From the Filter frequency envelope (set the envelope Target control to Filter frequency and the Articulation part to Envelope). This envelope controls the filter frequency (the same target as the CUT knob). Note that the filter section is set to BP (Band Pass) at 3X, a fairly steep cutoff either side of the filters center frequency. This means the filter is allowing through a narrow band of frequencies from the spectra and the Filter frequency envelope is moving the center frequency of the filter higher in the spectrum over time, to cause the upward sweeping frequency, reminiscent of a Gong sound. Grab the CUT knob and play some notes while moving it manually, to better understand what the Filter frequency envelope doing. However, remember that this filter sweep is simulating the loss the low harmonics moving toward the high-harmonics over time, Bawoosh!
Don't forget that the filter Cutoff & Resonance parameters can be tied to more than just the Envelope the other modulation parameters include LFO, Keyboard mapping, Velocity mapping & X/Y modulation, so there is plenty of creative potential there.
Plugin Credits -
Code & GUI: Didier Dambrin.