INSTRUMENTS / GENERATORS
MIDI Out
MIDI Out does not make any sound of its own, it acts as a MIDI controller sending standard MIDI messages to internal VST plugins or external MIDI hardware. 8 pages x 9 controllers are freely assignable to parameters on target VST and MIDI devices. For controlling external MIDI hardware, see a ![]() video tutorials here.
video tutorials here.

NOTES: Click gear icons to open the Control settings. Orange labels show activated controls (transmitting data), left-click the label to activate/deactivate controls.
Controlling internal VST plugins
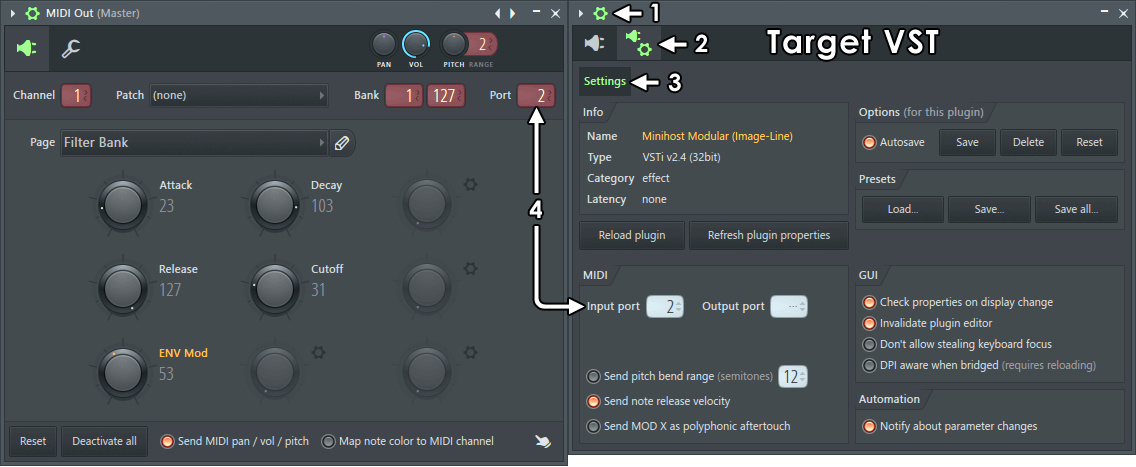
Use MIDI Out to gain access to features of a VST plugin not available from the Piano roll or Patcher. Set up MIDI Out to control internal VST plugins as follows:

- Open the Wrapper Options - Click the
 icon on the top of the VST plugins Wrapper.
- Open the Wrapper Settings - Click the
 icon.
icon.
- Select the Settings tab - Click the tab.
- Match MIDI Port numbers - Set the Input Port number on the VST plugin's wrapper to the same Port number as MIDI Out. 256 Ports are available, the Port number setting you use is arbitrary, it's up to you.
MIDI Channels - Where VST plugins respond to MIDI Channels 'Map note color to MIDI channel' can be used to play separate voices. You can also use the Control Settings to assign knobs to MIDI Channels. NOTE: Unless you have a specific reason to use MIDI Out, we recommend using note colors on the VST plugins Piano roll to play MIDI Channels. If necessary, you can load multiple MIDI Out plugins and match Port numbers to the VST and then set independent MIDI Channels for each MIDI Out. This will allow you to play each MIDI channel in the VST plugin from a separate Piano roll.
Controlling external synthesizers, drum machines & other MIDI devices
To incorporate the sound from external MIDI hardware in the final render, you will need to record the audio from the device into FL Studio while it's played or controlled by a MIDI Out plugin. See ![]() video tutorials here, the steps are as follows:
video tutorials here, the steps are as follows:

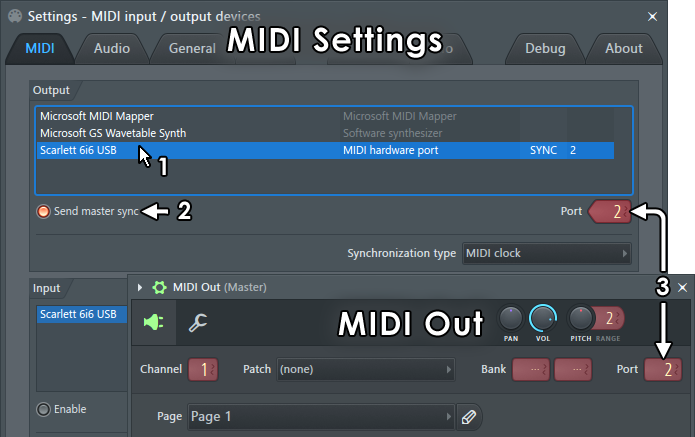
- From the MIDI Settings select the device in the Output list (click devices in the list to select them).
- Match Port numbers - From the MIDI Settings make sure the Port number matches the Port number on MIDI Out (any number between 0 and 255 can be used).
- Make MIDI connections - Connect your MIDI interface (MIDI OUT) to your MIDI device (MIDI IN) as per the manufacturers instructions.
- Set the MIDI Channels - Set your external MIDI device to the same MIDI Channel as the MIDI Out plugin. There are 16 Channels that allow you to control different MIDI devices on each channel. If you set your MIDI device to Omni mode it will respond to all MIDI Channels (see the manufacturers instructions).
- Send MIDI pan / vol / pitch - ONLY set this on if you intend to send Pan, Volume or Pitch-bend commands to the target device. OTHERWISE leave this off, as it can cause some devices to behave unpredictably when they receive these messages, when not supported.
- Send master sync - ONLY if the device has an internal sequencer, turn ON 'Send master sync' to transmit transport control data (start, stop, tempo, etc) from FL Studio. OTHERWISE leave this off, as many MIDI devices that don't handle transport data can behave unpredictably when they receive these messages. Ensure your external MIDI device is set to receive (slave to) MIDI sync data AND is set to the same 'Synchronization type', (MIDI clock, MTC 24, etc), as per the manufacturers instructions.
- Connect the audio - Make audio connections from your MIDI device's audio outputs to your soundcard audio inputs. This will usually be a line-level input, not a microphone input.
- Sequence your MIDI device - Enter or record your score data in the Piano roll or Step Sequencer associated with the MIDI Out controlling the external hardware.
- Loop-back recording (optional) - If you are playing MIDI notes on the external device you may hear doubled-notes, flanging or flaming. This happens because the device is playing sound internally from its own controller (no latency) and also receiving notes back from MIDI Out (with latency). Most hardware synthesizers and drum-machines have a setting, 'Local Control', that disables the keyboard or pads from playing sounds locally. See your device manual for details.
- Make a live recording - Record the device back into FL Studio, as it is played by the MIDI Out channel.
- Audio clips - Place the recorded Audio Clip in the Playlist and render the final track.
NOTE: MIDI is not an audio connection, see the Wizard section 'How do I connect my keyboard/controller/synth to my PC' for advice and further links on setting up external MIDI hardware to be recorded in FL Studio.
Parameters
MIDI Out is a flexible MIDI Output plugin with the following controls:
MIDI Out Controls
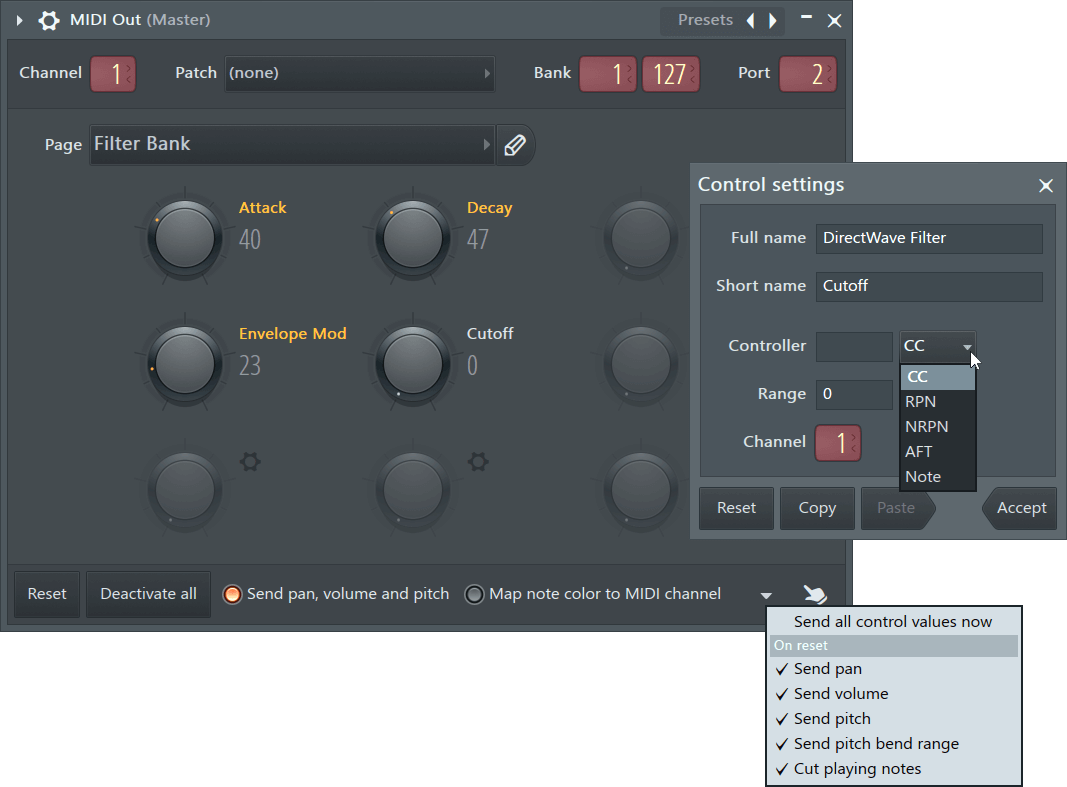
- Channel - There are 16 MIDI Channels used to make independent connections for note and controller data. For example, to play up to 16 separate instruments on a single 'multitimbral' VST plugin. NOTE: Piano roll note colors can also be used from a VST plugins own Piano roll to play separate MIDI Channels.
- Patch - 128 patches are available. The menu displays the name of the General MIDI instrument for the selected patch number. It won't match your VST plugin or MIDI instrument if it's not using the General MIDI mapping (which is likely). For some devices, the patch number also selects the drum kit for drum channels. On Windows, to hear these sounds as General MIDI instruments, load a Fruity LSD plugin into the mixer and set it to the same port number as the MIDI Out plugin. NOTE: This is old technology and may not work on your system. On macOS you will need to add Instruments to the Channel Rack scores.
- Bank (Coarse & Fine) - Patch bank number. There are 128 * 128 banks.
- Port - Ports are independent communications channels between MIDI Out and the target VST plugin or MIDI Interface. Matching port numbers on MIDI Out and the target creates the link. The Port number you choose does not matter, there are 256 available. If you are controlling external MIDI hardware the Port number should match the MIDI Settings Output port number set for your MIDI Interface.
- Page - There are 8 pages with 9 assignable controllers. All controllers are automatable. Click
 to name the page.
- Controller Knobs - Right-click controls to open the Control Settings. Orange labels show activated controls (transmitting data), click the label to activate/deactivate controls. Knobs can be linked to modulation targets on the VST plugin or MIDI device. To link a control knob Right-click a control and select 'Configure', and then set the number and data type CC, RPN, NRPN or AFT. See Control Settings for more details.
- Reset - Sends a reset (CC #121) message to your MIDI device, then updates all enabled controls. This switch is handy when you have disabled a control and you want its assigned controller to be reset by the MIDI device.
- Deactivate all - Deactivates all controls.
- Send pan, volume and pitch - Sends this additonal data (other than Note and CC) to the MIDI device.
- Map note color to MIDI channel - Piano roll note colors will be transmitted on their corresponding MIDI Channels.
- Transport flush options menu - By default MIDI Out sends the following MIDI data/commands when the FL Studio transport controls are used (Play or Stop). This can cause unexpected or undesirable behavior on some MIDI devices. The following data can be individually disabled:
- Send all control values now - All the commands/values listed below are sent. Useful where a hardware device was reset and you want it to have the 'correct' values again without starting or stopping playback in FL Studio.
- Send pan - Current channel pan value.
- Send volume - Current channel volume value.
- Send pitch - Current channel pitch value.
- Send pitch bend range - Current channel pitch bend range.
- Cut playing notes - All MIDI notes 'stop' command (on transport stop).
 Multitouch - Select to control more than one knob at a time on a touch interface.
Control Settings
Click the ![]() icons or right-click a knob and select 'Configure':
icons or right-click a knob and select 'Configure':

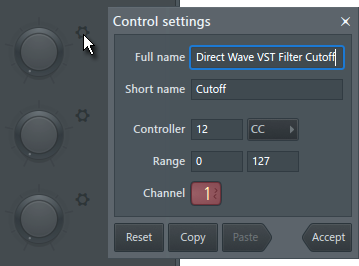
- Full name - The long name will show in the Hint panel. Use this to add full details and notes about a control for reference.
- Short name - Name displayed next to knob. Click the label to activate/deactivate the control.
- Controller - 1. Set a value. 2. Choose a data type (-1 deactivates the control):
- CC - Continuous Controller. For example CC 1 is assumed to be used by a MOD Wheel target, CC 64 a sustain pedal target, according to the MIDI standard.
- RPN - 'Registered Parameter Numbers' have been assigned to particular functions by the MIDI Manufacturers Association.
- NRPN - 'Non-Registered Parameters Numbers' may be used for custom functions as determined by hardware manufacturers.
- AFT - Aftertouch. Modulation assumed to come from pressure on a keyboard key (or pad) after it has been struck and is being held.
- Note - Automates sending notes on and off. When selected Velocity and Note Range are available. A note value of 0 = Note OFF.
NOTE: A setting of -1 deactivates the control and hides the 'Short name' label.
- Range - Set lower and upper limit.
- Channel - MIDI Channel. NOTE: When Channel 10 is selected, the Piano roll will show the MIDI Drum standard instrument names. Channel 10 is used by the MIDI standard for drums. You can change the names hown by editing ..:\Program Files (x86)\Image-Line\FL Studio N\Plugins\Fruity\Generators\MIDI Out\Data\GM Drums.txt
Notes & Tips
- Per-note - Pan, filter cutoff & resonance (by Event edit or the Piano roll) are not supported, the MIDI standard only supports per-note velocity.
- As there is no standard rule for mapping velocity values (0..127) to dB, the level scale of MIDI Channels may not fit the internal mixer scale. For example, note velocities of 127 may not reach 0 dB.
Plugin Credits: Didier Dambrin