INSTRUMENTS / EFFECTS
Patcher
Patcher loads as an instrument or effect and allows you to chain both instruments and effects into complete units for reuse in other projects. Set up your favorite instrument & effects chain for example. You can also use it to add unlimited effects or instruments in a single Channel or Effects slot. Related plugins: Control Surface, Fruity Layer and Minihost Modular.

NOTES:
- The workspace is resizable - Drag on the window to resize OR drag an object to the edge of the workspace to auto-resize.
- Arranging - The menu option 'Auto-arrange modules' creates module columns to represent multithreaded processing logic.
- Processing - Modules added at the same number of nodes (after the 'From FL Studio' node) are processed at the same time (multithreaded), modules at different node-depths columns are processed sequentially.
- Patcherize existing plugins - Hold (Shift) and drop Patcher over them.
Patcher Controls
Data Links Filters
(Left-Click) to switch filter groups On/Off. (Middle Mose-Click) to Solo/Unsolo a filter group.
- Audio (yellow) - Shows Audio links (inputs & or outputs depending on the plugin).
- Parameters (red) - Shows internal automation parameter links (plugin program/interface controls).
- Events (green) - Shows note/event links (MIDI control data).
NOTE: Placing the mouse cursor over Link Nodes will show their name in the Hint Bar.
Working with links
- Make connections - Objects in Patcher have inputs on the left-side and/or outputs on their right-side. The connectors show as dots with colors that relate to the Parameter data type (see above). Click on any output or input connector and drag to a compatible connector (shown in green).
- Dragging to the Middle of an object - Will open a pop-up list of compatible link targets.
- Add / Remove connectors - (Right-Click) the FL Studio icons, plugins or parameters and activate/deactivate connectors.
- Automate plugin controls - You will first need to activate the controls Automation input to the plugin. These are not activated by default as there may be 100's of controls, and so 100's of input nodes. Proceed to link as follows:
- FL Studio native plugins - (Right-Click) the control and select 'Activate'. Then (Right-Click) it again and select Create Automation clip.
- VST & AU plugins - (Right-Click) the plugin and choose Inputs > Parameters and select the control. Then (Right-Click) the controls red node that appears on the plugin input side and select Create automation clip.
NOTE: Automation inputs show as a red node and do not have connection cables to the FL Studio input/output icons.
- Break a single connection - Left-click the input connector of a pair. Drag off the input into free space and release the mouse button.
- Change connections - Left-click the input connector point and drag to the new target input connector.
- Audio level - Click on the center arrow on a connection cable and drag vertically. The volume values are displayed in the Hint Bar.
- Mute audio - (Right-Click) the link.
- Right-Click nodes (and modules) - To see a popup with options, including to activate nodes, add links etc.
Events or MIDI to FX plugins
If you need to get MIDI data to an Instrument plugin that's loaded on Patcher in an FX slot, then:
- Load a MIDI Out channel and set it to 'Port 5', for example.
- Right click the 'From FL Studio' icon
- Select Patcher > Outputs > Events and activate 'Port 5'.
- Make the Event connection from FL Studio to the Plugin as normal.
Saving/Loading Patcher Presets
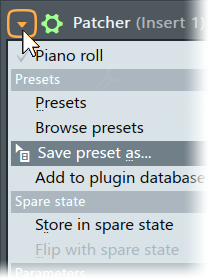
- To save a patcher preset - use the Wrapper Menu 'Save preset as' option. You can also drag this menu item to a new Channel or Effects slot to duplicate the current chain. Patcher is a great way to save your favorite Instrument & Effects chains ready for use in new projects.
- Encapsulate existing plugins - You can 'patcherize' existing plugins on a Channel Rack or Mixer Track slot by holding (Shift) and dropping Patcher onto the existing plugin. If you don't hold SHIFT the plugin will be replaced rather than encapsulated.
Tabs
There are two tab types. The Map which is the main workspace and layout window for the Patcher project and the Control Surfaces that hold internal controllers for the project. These can be renamed, right-click the control-surface icon on the Map tab, to better reflect their use. You can add as many Control Surfaces as you need to the project.
Map
The MAP tab allows you to build the plugin & or effects chain.
- Add plugins & controls - (Right-Click) the workspace and add from the pop-up menu - Plugins, Effects or a Control Surface.
- Opening plugins - As of FL Studio 12 plugins now open in 'detached' mode outside the Patcher UI when double-clicked (see below). NOTE: Plugin interface parameters are not right-click linkable or visible to FL Studio unless a GUI (interface) target has been right-clicked and 'activate' selected. Once this has been done a Parameter node for the control will also appear on the plugins Map tab icon. There are two ways to open plugins:
- Open a plugin and close all others - (Double-click) a plugin. This applies only to plugins open for that Patcher instance.
- Open a plugin leave others also open (Alt+Click) a plugin. This applies only to plugins open for that Patcher instance.
- Show data types - (Right-Click) the workspace and select from the pop-up menu the data types to be shown (including latency) OR use the Audio, Parameters & Events buttons along the top of the plugin.
- Rename objects - (Right-Click) the target object and select 'Rename' from the pop-up menu.
- Delete objects - (Right-Click) the target object and select 'Delete' from the pop-up menu.
- To add control surfaces & plugins - Use (F8) OR (Middle-Click) on the FL Studio desktop to open the Plugin Picker OR drag from the Browser > Plugin database to Patcher's Map tab window.
Right-Click Map Menu
- Show plugin picker (F8) - Opens the Plugin picker.
- Add plugin - Shows the Plugin Favorites list. Add plugins to this list using the 'F' (favorite) column in the Plugin Manager.
- View - Control the viewing of:
- Audio / Events / Parameters - Various data connections between plugins.
- Activity - Animations on connections that show data flow.
- Labels - Switch plugin labels, on or off, as shown below their icons.
- Latency - Shows a panel above the plugin with processing latency shown in ms. Latency compensation within Patcher is automatic.
- Performance - Use this to identify resource intensive plugins. Each module will show a CPU value in percent (above it) and a summary panel will additionally show:
- Total - The CPU total for the current instance of Patcher (sum of everything below).
- Patcher - CPU used processing the Inputs to and Outputs from Patcher (interfacing with FL Studio).
- Modules - Total CPU usage of all modules.
- Other - Internal CPU overhead.
NOTE: The CPU measures shown are based on the same metric used for FL Studio's main CPU meter. The percentage of the audio buffer length (time) required to create the audio for that buffer. The CPU percentages shown here, therefore, do not match the Operating System CPU meter, which shows the percentage of processing slots in use. See here for a detailed explanation.
- Auto-arrange modules - Do you trust us to arrange your modules for you? Click it if you dare. Multithreaded processing - This option also creates module columns to represent multithreaded processing logic. Modules in the same column are processed at the same time (multithreaded), modules in separate columns are processed sequentially.
- Hide all plugin windows - Hides all open Plugin interfaces from the current Map.
- Remember tab sizes - Individual tab sizes will be remembered as you switch between them.
- Link velocity - Links MIDI velocity to plugins on the Map that use it.
- Multithread plugins on this map - Switches on Multithreading for plugins on the current Map. Learn more about multithreading here.
- About - Shows Patcher version information, useful for Techsupport.
Control Surface
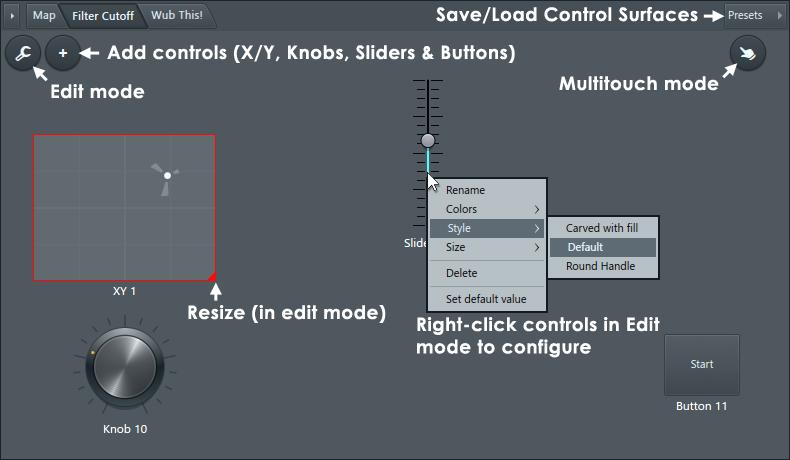
The CONTROL SURFACE tab/s allow you to add real-time controls that can be linked to plugins in the Map chain. Parameter objects can be linked to plugins by Right-clicking the plugin on the MAP tab and activating a Parameter by Right-clicking on the plugin. (Right-Click) a control to automate it from this tab. You can add as many separate Control Surface tabs as needed to a project. In the image below there are two Control Surfaces, one has been renamed 'Wub this'.
NOTE: You can create your own custom controls with the Control Creator tool. (Right-Click) the Map and select Control creator to open it.
Working on the Control Surface tab:
- Add a Control Surface - The default Patcher loads with a single Control Surface, to add additional Control Surfaces drag from the Browser > Plugin database > Patcher > Control Surface and drop on Patcher. NOTE: If your plugin database is different, just search for 'Control Surface'.
- Load/save Control Surfaces - Click the Presets button as shown above and either save or load a Control Surface configuration.
- Add parameter controls - Click the + (Add) button as shown above and select from the pop-up menu of controls.
- Edit parameter controls - Click the Edit icon as shown above (controls will show red-rectangles around them) then you can click and drag to move or right-click and select the size, style, colors and rename the control.
- Automate Native Parameters - From the MAP tab (Right-Click) the Plugin Icon and select 'Activate' from the pop-up menu. The control can be Right-clicked again and automated with the usual options such as 'Create automation clip' or 'Link to controller'.
- Link plugin parameters to Control Surface parameter controls
- 1. Add a Control Surface control with the + button or you can use an existing control.
- 2. Open the Map tab and drag FROM the controls related Parameter node on the right side of the Control Surface icon ONTO the middle of the target Plugin icon and release.
- 3. From the pop-up list select the desired GUI or plugin control target.
- Automate VST Parameters -
- 1. (Right-Click) the plugin on the MAP tab and select:
- 2. Inputs > Parameter and select the automation target Parameter from the pop-up list.
- 3. (Right-Click) the red Parameter Node that appears on the Plugin and 'Create automation clip', 'Link to controller' or 'Edit events' as usual.
- Rename Parameters - (Right-Click) the parameter and select 'Rename' from the pop-up menu.
- Live tweaking - Open the Parameter tab and use the mouse on the Parameter of interest as you would any plugin control. Select Multitouch to control multiple controls on a multi-touch monitor.
Patcher Voice Effects Plugins
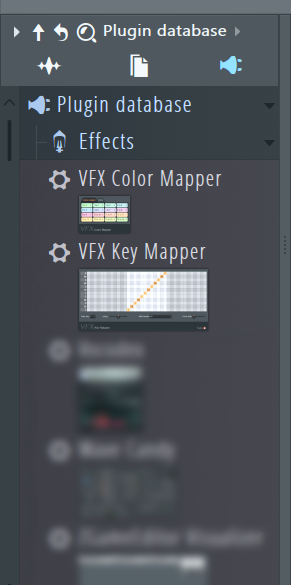 | To add VFX Note Mapper to the Patcher project, dragging from the Browser > Effects > Voice category and drop on the Patcher Map. For fast linking drop on the Events link into the plugin you would like to control. VFX can't be used in FL Studio Channel or Effects slots so they are not generally made visible in the plugin lists. The VFX plugins include: |
- VFX Color Mapper - Control up to 16 independent generators/instruments (or groups of generators) using the 16 note colors of the Piano roll.
- VFX Envelope - Control up to 16 independent envelopes x Velocity, Pitch and Pan. Plus Mod X and Mod Y, using the 16 note colors of the Piano roll.
- VFX Key Mapper - Note input can be transposed, made into a chord, key-changed or creatively remapped.
- VFX Keyboard Splitter - Split the Piano roll or keyboard zones into 16 separate outputs.
- VFX Level Scaler - Scale Note Properties as received from the Piano roll. .
Plugin Credits: Frederic Vanmol